Microsoft Word is a powerful tool for creating documents, and one of its lesser-known but highly useful features is the ability to add checkboxes. Checkboxes are perfect for creating forms, to-do lists, surveys, or any document that requires interactive or printable options for selection. In this guide, we’ll take an in-depth look at how to add checkboxes in Word, catering to both interactive digital needs and print-only purposes.

Types of Checkboxes in Word
Before we begin with the steps, it is important to know that there are two major types of checkboxes you can insert in Word:
- Interactive Checkboxes: Useful when creating electronic documents where users can click the box to check or uncheck.
- Printable Checkboxes: Static symbols that appear as blank boxes in print where a user can mark manually.
- Let’s dive into step-by-step instructions on how to get both into your Word documents.
Adding Interactive Checkboxes
Interactive checkboxes allow readers to interact directly with your document. Here is how to do it:
Step 1: Turn on the Developer Tab
- You will have to add the Developer tab in order to add checkbox tools in Word.
- Open Microsoft Word
- Click on File > Options.
- In the Word Options window, select Customize Ribbon from the left-hand sidebar .
- At the bottom section called Main Tabs, click the tickbox beside Developer, then OK.
- You should see now the Developer tab in your ribbon.
Step 2: Insert Checkboxes
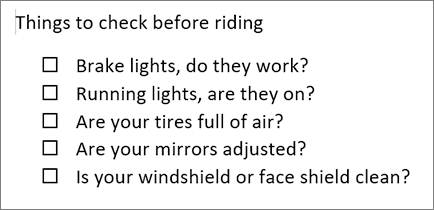
- Type your list or the content with which you want to add checkboxes.
- Place your cursor at the beginning of the first line.
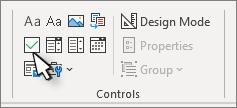
- Go to the Developer tab and click Check Box Content Control in the Controls group. This will include a clickable checkbox in your document.
Step 3: Duplicate Checkboxes
Rather than adding a checkbox to every line, you can easily duplicate it:
- Copy the checkbox you just added (Ctrl+C).
- Paste it (Ctrl+V) at the start of each subsequent line in your list.
Step 4: Change the Checked Symbol
Word defaults to an “X” when a checkbox is marked. You can swap this symbol with a checkmark or some other character:
Select the checkbox.
- Proceed to the Developer tab and then click Properties in the Controls group.
- In the Content Control Properties window, click Change under the Checked symbol
- Select a new symbol like a checkmark (✔) from the given list and then click OK to apply it
Step 5: Lock the Checkboxes
To avoid unwanted changes to your list or checkbox format:
- Select the entire list including checkboxes.
- Developer > Group > Group.
- This locks the controls, ensuring users can only check or uncheck the boxes without modifying the text.
Adding Printable Checkboxes
If you’re designing a document for printing, such as a checklist or survey, printable checkboxes are an excellent option.
Step 1: Create Your List
Type your list in the Word document.
Ensure each item is on a new line for clarity.
Step 2: Add Checkboxes Using Bullet Points
Highlight your entire list.
Open the Home tab and click the drop-down arrow next to the Bullets button in the Paragraph group.
Under Define New Bullet, click the drop-down arrow next to the Bullets button, in the Paragraph group.
In the Define New Bullet window, click Symbol.
Select a checkbox symbol in the Wingdings or Segoe UI Symbol fonts. Find an empty square or box.
Click OK to apply your selected symbol as the bullet point.
Step 3: Indentation
If your list items are long, hanging indentation can keep things neat and tidy:
Select your list.
Go to the Home tab, click the Paragraph dialog box launcher in the Paragraph group.
Under the Indentation section, select Left as 0.25 inches and Special as Hanging.
You can change the By value if desired; the default is 0.5 inches.
Click OK to apply.
Interactive and Printable Checkboxes
You can combine both interactive and static checkboxes for use both digitally and in print. For instance, you could have interactive checkboxes for the electronic version but instructions to print and mark boxes for those readers who do not have digital access.

Tips on Formatting and Enhancing Your Checkbox List
Use Constantly Balanced Arrangement: Regardless of your checkboxes being either interactive or printable, make sure they are aligned well with the text to make it very presentable.
Color Coding: Consider using colored checkboxes or text to emphasize different sections of your list.
Font Selection: When adding symbols for printable checkboxes, choose fonts that match your document’s overall style.
Headers and Subheaders: Break down long lists into sections with headers for easier navigation.

Common Issues and Troubleshooting
Checkboxes Not Clicking Properly
Ensure the document is not in Design Mode. Go to the Developer tab and click Design Mode to toggle it off.
Checkbox Symbols are Missing
If you don’t see checkbox symbols in the Symbol dialog box, switch the font to Wingdings or Segoe UI Symbol for a wider selection.
Text Overlaps Checkboxes
Just add a tab or space after the checkbox to change the spacing between the checkbox and the text.
Conclusion
Adding checkboxes to a Microsoft Word is an easy process and can make your document much more functional and appealing. You may require interactive checkboxes for digital use or static ones for printed lists; Word allows you to get all that you need from its range of versatile options.
This guide will help you to create professional checkbox lists easily and efficiently. Remember to balance form with functionality; checkboxes can fall into neat alignment with your content and perform their intended function.
With checkboxes, your Word documents turn from lifeless text to powerful user engagement and productivity tools.


